Node.jsの自作ライブラリをTypeScriptでつくってnpmに公開して、アプリから参照するやりかた
Electronでアプリ開発していると共通ライブラリが作りたくなったので、
Node.jsのライブラリをTypeScriptでつくってnpmに公開するやり方をまとめます。
実際に"Firx"というライブラリを作成して公開するまでの手順なので適宜読み替えてください。
- パッケージ名を決定
- フォルダを作成
- typescriptをインストール
- tsc --initを実行
- npm initを実行
- package.jsonを編集
- tsconfig.jsonを編集
- npmignoreを作成
- ソースファイルを追加
- srcフォルダにindex.tsを作成
- npmでアカウントを作成
- npmにログイン
- npm publishを実行
- npmで公開されていることを確認
- アプリから使用
- 最後に
パッケージ名を決定
パッケージ名を決めます。なんでもいいですが、すでに公開されているものは使用できないのでnpmで確認してください。
フォルダを作成
場所はどこでもOKなので、フォルダを作成します。パッケージ名がいいと思います。
typescriptをインストール
上記で作成したフォルダをvscodeで開き、ターミナルを開いて以下のコマンドを入力。
> npm install typescript
tsc --initを実行
以下のコマンドを実行して、tsconfig.jsonを作成します。
パスを通す方法がありますが、今回しか使わないのでこれで十分です。
> .\node_modules\.bin\tsc --init
npm initを実行
package.jsonを作成します。
以下のコマンドを実行して質問に答えていくとできます。あとから編集できます。
> npm init
package.jsonを編集
package.jsonを編集します。以下を参考にする。
{
  "name": "firx",
  "version": "0.0.1",
  "description": "Electron Application Develop Support Libraries",
  "main": "index.js",
  "types": "index.d.ts", // 追加:型定義のルート
  "dependencies": {
     "electron-store": "^5.1.1" // 追加:依存するライブラリがあれば記述する
  },
  "devDependencies": {
    "typescript": "~3.9.3" // 変更:typescriptのバージョンをアプリに合わせる
  },
  "scripts": {
    "test": "echo \"Error: no test specified\" && exit 1",
    "build": "tsc", // 追加:buildでtypescriptをコンパイル
    "prepublishOnly": "npm run build" // 追加:publish前にビルドする
  },
  "author": "FINALSTREAM",
  "license": "MIT"
}
tsconfig.jsonを編集
tsconfig.jsonを編集します。以下を参考にする。
{
  "compilerOptions": {
    /* Visit https://aka.ms/tsconfig.json to read more about this file */

    /* Basic Options */
    // "incremental": true,                   /* Enable incremental compilation */
    "target": "es5",  // 変更:バージョンをアプリに合わせる       /* Specify ECMAScript target version: 'ES3' (default), 'ES5', 'ES2015', 'ES2016', 'ES2017', 'ES2018', 'ES2019', 'ES2020', or 'ESNEXT'. */
    "module": "commonjs",
    ...
    "declaration": true,  // 変更:コメントをはずす。型定義を生成するオプション                   /* Generates corresponding '.d.ts' file. */
    // "declarationMap": true,                /* Generates a sourcemap for each corresponding '.d.ts' file. */
    // "sourceMap": true,  // 変更:コメントをはずす。デバッグ用のmapファイルを生成するオプション       /* Generates corresponding '.map' file. */,
    // "outFile": "./",                       /* Concatenate and emit output to single file. */
    "outDir": "./"  // 変更:コメントをはずす。コンパイルしたファイルの出力先 /* Redirect output structure to the directory. */,
   ...
   },
  "include": ["src/**/*.ts"],  // 追加:コンパイル対象のファイル 。srcフォルダの*.tsファイルを対象
  "exclude": ["src/**/*.spec.ts"]  // 追加:コンパイル対象外のファイル。テストコード(*.spec.ts)は含めない
npmignoreを作成
npmで公開するファイルで除外するものを記述します。
ソースやコンパイル定義は公開しないようにする。
tsconfig.json
src
ソースファイルを追加
srcフォルダを作成し、クラスのtsファイルを作成します。
src/AppStore.ts
import Store from "electron-store";

export default class AppStore {
  private static _store = new Store();

  public static get instance(): Store {
    return this._store;
  }
}
srcフォルダにindex.tsを作成
モジュールを公開するためのルートスクリプトを作成します。
クラスが複数ある場合は同じように複数行記述します。
src/index.ts
export * from "./AppStore";
npmでアカウントを作成
npmで公開するためにアカウントを作成します。
npmにログイン
npm publishを実行する前にログインをするため、以下のコマンドを実行します。
ユーザ名とパスワードを聞かれるので入力します。
> npm adduser
最後に以下のような表示がされればログイン成功です。
Logged in as finalstream on https://registry.npmjs.org/.
ちなみにログインせずにnpm publishを実行すると以下のようなエラーがでます。
npm ERR! code E404
npm ERR! 404 Not Found - PUT https://registry.npmjs.org/firx - Not found
npm ERR! 404
npm ERR! 404  'firx@0.0.1' is not in the npm registry.
npm ERR! 404 You should bug the author to publish it (or use the name yourself!)
npm ERR! 404
npm ERR! 404 Note that you can also install from a
npm ERR! 404 tarball, folder, http url, or git url.

npm ERR! A complete log of this run can be found in:
npm ERR!     C:\Users\final\AppData\Roaming\npm-cache\_logs\2020-09-22T01_23_58_048Z-debug.log
npm publishを実行
npmに公開するため、以下のコマンドを実行します。
公開前にビルドが行われます。
一度publishしたら、同じバージョンではpublishできないので注意。
> npm publish
以下のように表示されれば成功です。
npm notice
npm notice package: firx@0.0.9
npm notice === Tarball Contents ===
npm notice 706B AppStore.js
npm notice 759B index.js
npm notice 905B IpcResponse.js
npm notice 393B MessageLevel.js
npm notice 484B package.json
npm notice 288B AppStore.js.map
npm notice 148B index.js.map
npm notice 752B IpcResponse.js.map
npm notice 247B MessageLevel.js.map
npm notice 78B  README.md
npm notice 136B AppStore.d.ts
npm notice 94B  index.d.ts
npm notice 235B IpcResponse.d.ts
npm notice 112B MessageLevel.d.ts
npm notice === Tarball Details ===
npm notice name:          firx
npm notice version:       0.0.9
npm notice package size:  2.3 kB
npm notice unpacked size: 5.3 kB
npm notice shasum:        428062e0c8c521fdc210e3814c9b451a746922b2
npm notice integrity:     sha512-D7GBce7iKV3uE[...]YLiCLLnyBjNew==
npm notice total files:   14
npm notice
+ firx@0.0.9
npmで公開されていることを確認
以下のようにパッケージ名をurlに入れてアクセスすると公開されていることが確認できます。
https://www.npmjs.com/package/[パッケージ名]
成功していると以下のような感じ表示されます。
アプリから使用
アプリの開発フォルダをvscodeで開いて、以下のコマンドをターミナルで実行します。
パッケージ名は作成したものを指定します。
> npm install firx
以下のようにインポートすると使用できます。
ポイントは"パッケージ名/クラス名"というように指定するところです。
import AppStore from "firx/AppStore";
最後に
TypeScriptだと型定義を自分で作らないといけないかなと思っていましたが、ソースから自動生成されるので心配無用でした。
いまのところ、このやり方でできていますが、開発を進めていったときにうまくいかないことが出たらまた追記したいと思います。
今回つくったライブラリはGitHubで公開していますので、うまく動かないときは参考にしていただければと思います。
GitHub Actionsを使ってElectron with Vue.jsアプリのWindows/MacOS/Linux向けパッケージを同時に自動リリースするやりかた
Electronアプリを作ってGitHub Actionsを使って自動でビルドしてリリースしたいと思って調べてできたやり方をまとめます。
C#アプリではAppVeyorでやっていましたが、あの頃はGitHub Actionsなんてものはなかったので、今回はGitHub Actionsを使います。
GitHub Actionsとは
いわゆるCI/CD(継続的インテグレーション/継続的デリバリー)というやつで、Jenkinsみたいなやつです。
ブランチにコードがコミットされたタイミングで自動でビルドして、自動でリリースする仕組みを構築できます。
GitHub ActionsではWindows、MacOS、Linux(Ubuntu)の3環境でビルドできます。
ワークフローを作成する
GitHubのリポジトリを開くと"Actions"があると思うので、そこをたたいて"New workflow"を選択します。
次の画面でテンプレートを選べますが、残念ながらElectronのテンプレートはないのでスキップします。
スキップは"set up a workflow yourself "を選択します。
自動ビルド&リリースのコードを記述する
AppVeyorは自動リリースする際、設定画面でいろいろするべきことが多かったですが、
GitHub Actionsはコードだけで完結します。
コードはyamlで記述します。
コードもブラウザ上で編集できます。
アプリはVue CLIを使っている必要がありますが、以下のコードを貼り付けるだけです。
name: Build Release Electron

on: [push]

jobs:
  build:

    runs-on: ${{ matrix.os }}

    strategy:
      matrix:
        os: [windows-latest, macos-latest, ubuntu-latest]

    steps:
      - name: Set Context
        env:
          GH_TOKEN: ${{ secrets.GH_TOKEN }}
          GITHUB_CONTEXT: ${{ toJson(github) }}
        run: echo "$GITHUB_CONTEXT"
      - uses: actions/checkout@v1
        with:
          fetch-depth: 1
      - name: Set Node.js Version
        uses: actions/setup-node@v1
        with:
          node-version: 14.x
      - name: Install Yarn
        run: |
          yarn install
      - name: Install Vue CLI
        run: |
          yarn global add @vue/cli
      - name: Build for Windows
        if: matrix.os == 'windows-latest'
        run: |
          yarn run electron:build --windows nsis zip --x64  --publish never
      - name: Build for MacOS
        if: matrix.os == 'macos-latest'
        run: |
          yarn run electron:build --macos dmg --x64  --publish never
      - name: Build for Linux
        if: matrix.os == 'ubuntu-latest'
        run: |
          yarn run electron:build --linux AppImage --x64  --publish never
      - name: Upload Artifacts for Windows Zip
        if: matrix.os == 'windows-latest'
        uses: actions/upload-artifact@v2
        with:
          name: ${{ github.event.repository.name }}-Zip Package
          path: dist_electron/*.zip
      - name: Upload Artifacts for Windows Installer
        if: matrix.os == 'windows-latest'
        uses: actions/upload-artifact@v2
        with:
          name: ${{ github.event.repository.name }}-Windows Installer
          path: dist_electron/*.exe
      - name: Upload Artifacts for MacOS
        if: matrix.os == 'macos-latest'
        uses: actions/upload-artifact@v2
        with:
          name: ${{ github.event.repository.name }}-Dmg Package
          path: dist_electron/*.dmg
      - name: Upload Artifacts for Linux
        if: matrix.os == 'ubuntu-latest'
        uses: actions/upload-artifact@v2
        with:
          name: ${{ github.event.repository.name }}-AppImage Package
          path: dist_electron/*.AppImage
      - name: Release
        uses: softprops/action-gh-release@v1
        if: startsWith(github.ref, 'refs/tags/')
        with:
          files: |
            dist_electron/*.zip
            dist_electron/*.exe
            dist_electron/*.dmg
            dist_electron/*.AppImage
        env:
          GITHUB_TOKEN: ${{ secrets.GITHUB_TOKEN }}
※ 2021/07/24 electron13に更新した際に以下のエラーが出て動かなくなっていたので修正
InvalidConfigurationError: GitHub Personal Access Token is not set, neither programmatically, nor using env "GH_TOKEN"
ちなみにリポジトリ固有の情報はないのでそのままいけます。
nodeのバージョンのところはアプリに合わせて修正してください。
修正が終わったら右上の"Start commit"ボタンでコミットします。
ビルドをしてみる
ブランチにプッシュするだけで自動でビルドが始まります。
ビルド中は黄色でくるくる回ります。

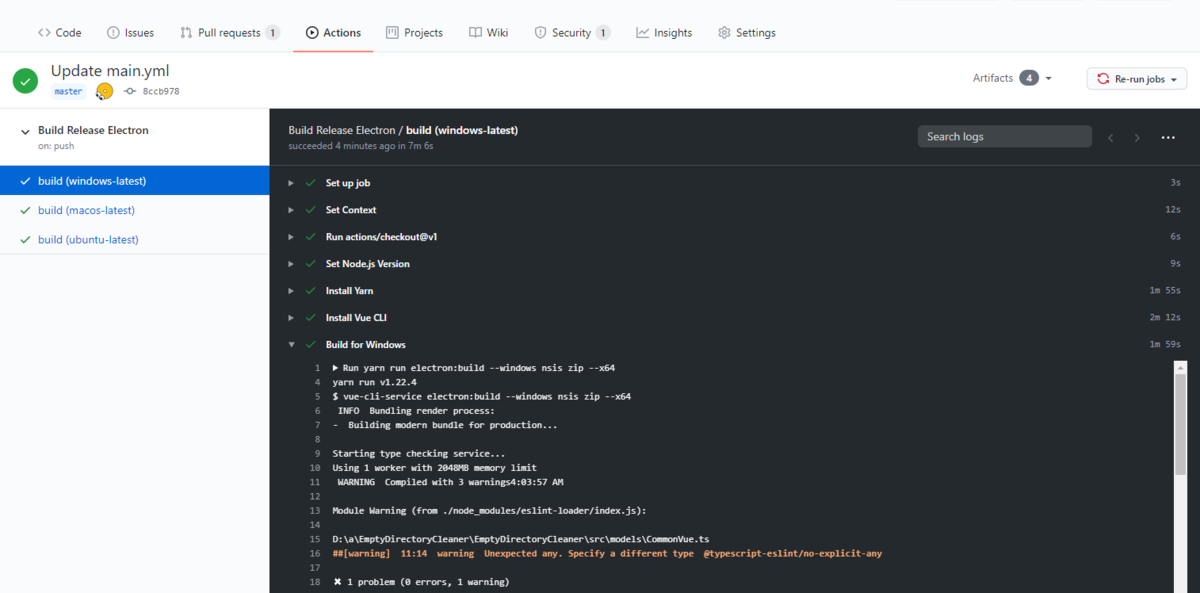
ビルドが完了したら緑のチェックマークになります。ビルドを選択するとビルドしたものをダウンロードできます。
ビルドしたものはArtifactsとして登録されています。
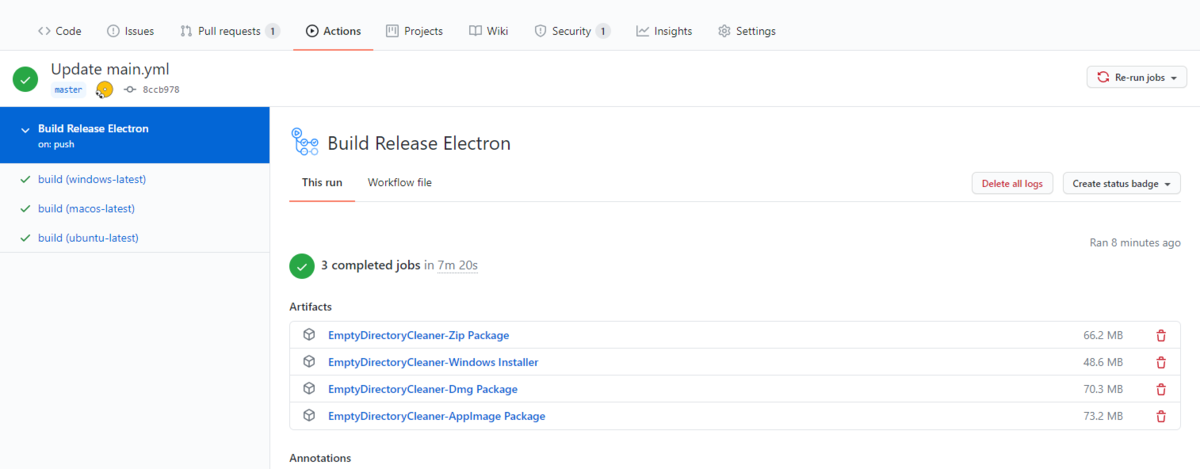
左側にあるbuild(xxxx)を選択すると各プラットフォームごとのビルド結果の詳細を確認することもできます。
エラーが発生した場合はここを確認しましょう。
リリースをしてみる
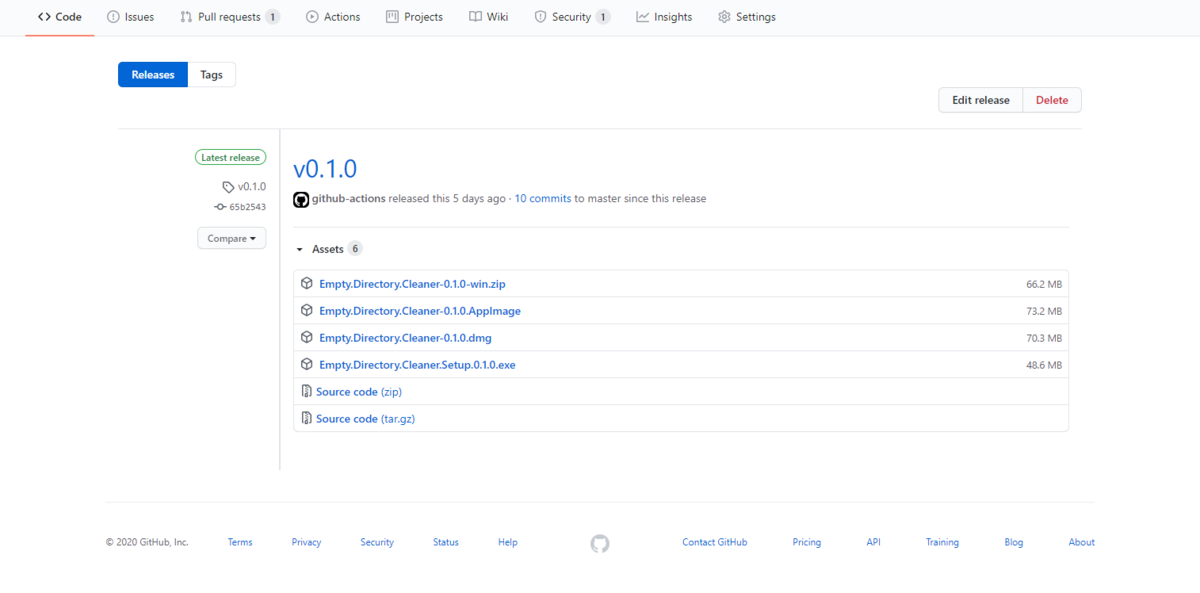
ブランチにプッシュしただけではリリースされません。
タグをうつとビルド後にリリースされます。
リリースされるとビルドしたものがAssetsとして登録されています。
最後に
GitHub ActionはのGitHub機能なのでGitHubの連携設定とか不要で便利ですね。
またクロスプラットフォーム向けのビルドにも使えるので今後使っていきたいと思います。
Electronでユーザーに変更させたい設定と変更させたくない設定を保存/読込するやりかた
Electronでアプリを開発していてアプリ設定を保存することは欠かせないと思います。
アプリ設定といっても、ユーザーに変更させたい設定と変更させたくない内部設定があると思います。
ここではその用途別にやり方をまとめます。
ユーザーに変更させたい設定を保存/読込
ユーザーに変更させたい設定は"electron-store"を使うことで簡単に管理できます。
electron-storeをインストール
vscodeのターミナルのところで以下のコマンドをたたきます。 typescriptの型定義もはいってるみたいでTypeScriptでも使えます。
npm install electron-store
保存する
コード内の任意のところでインスタンスを生成し、setメソッドでキーと値を指定することで保存できます。 以下の例はアプリ終了時にウインドウの大きさと位置を保存するコードです。
import Store from "electron-store";

win.on("close", () => {
    const store = new Store();
    store.set("window.x", win!.getPosition()[0]);
    store.set("window.y", win!.getPosition()[1]);
    store.set("window.height", win!.getSize()[1]);
    store.set("window.width", win!.getSize()[0]);
});
保存された内容を確認
Windowsだと以下のパスにjson形式で保存されます。
アプリ名はpackage.jsonに定義されているnameの値になります。
C:\Users\[ユーザー名]\AppData\Roaming\[アプリ名]\config.json
保存されているファイルは以下になっています。
{
    "window": {
        "x": 114,
        "y": 335,
        "height": 600,
        "width": 800
    }
}
保存した設定を読込む
コード内の任意のところでインスタンスを生成し、getメソッドでキーを指定することで読み込みできます。
以下の例は保存したウインドウの情報を読み込んでウインドウを生成するコードです。
import Store from "electron-store";

async function createWindow() {
  const store = new Store();
  // Create the browser window.
  win = new BrowserWindow({
    x: store.get("window.x"),
    y: store.get("window.y"),
    width: store.get("window.width", 800),
    height: store.get("window.height", 600),
    webPreferences: {
      // Use pluginOptions.nodeIntegration, leave this alone
      // See nklayman.github.io/vue-cli-plugin-electron-builder/guide/security.html#node-integration for more info
      nodeIntegration: !!process.env.ELECTRON_NODE_INTEGRATION,
      //nodeIntegration: true,
    },
    title: AppConfig.AppName,
  });
ユーザーに変更させたくない設定を保存/読込
ユーザーに変更させたくない設定はクラスで定義できます。
設定値を定義する
クラスを以下のように定義します。
staticメンバーとして設定値を定義します。
/**
 * アプリ設定
 */
export default class AppConfig {
  /**
   * アプリ名
   */
  static AppName = "Empty Directory Cleaner";
  /**
   * ロガー設定ファイル
   */
  static LoggerConfigFile = "./log4js.config.json";
}
設定値を使用する
クラスをインポートして参照するだけです。
import AppConfig from "./models/AppConfig";

configure(AppConfig.LoggerConfigFile);
最後に
もっといいやり方があれば更新したいと思います。